More than ever, families and friends are enjoying top-tier audio and video systems from the comfort of their homes. At Sound World of Green Bay, we sell and install premium home theater systems, featuring in-wall and in-ceiling speakers, media rooms, and whole-house audio solutions. We also offer cutting-edge video surveillance systems for complete home security. Trust us to deliver an unmatched entertainment experience tailored to your needs.

Pre-wiring for audio in new home construction is an essential step to ensure high-quality sound distribution throughout the home. During the building process, electrical contractors install dedicated wiring systems that allow for seamless integration of speakers, amplifiers, and audio equipment in every room. This pre-wiring includes running cables for surround sound systems, whole-house audio setups, and multi-room audio controls. By planning ahead and incorporating audio wiring early on, homeowners can avoid unsightly wires, ensure optimal speaker placement, and have a streamlined, professional sound experience once the home is completed. Additionally, pre-wiring makes it easier to upgrade or expand the system in the future without the need for invasive retrofitting.
Don’t wait until your home is finished to think about sound. Planning your whole-home audio system during the construction phase allows for ideal speaker placement, hidden wiring, and a clean, seamless install with no compromises.
Designing your system before the walls go up, you get better sound coverage, a more polished look, and a system that feels truly built into your home. From in ceiling speakers to outdoor audio, early planning ensures every space sounds exactly the way it should.
Thinking about building or remodeling? Now is the perfect time to design your whole home audio system and do it right the first time.
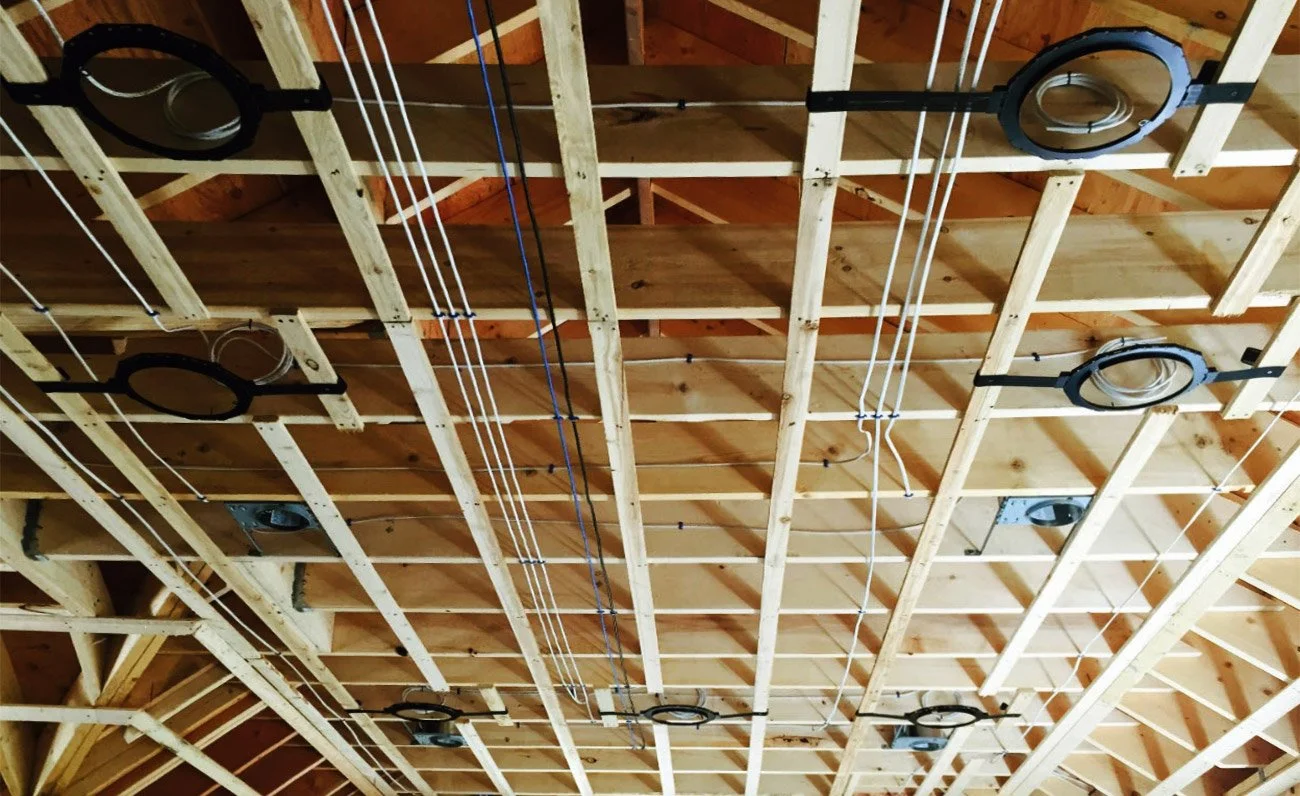
Before the walls go up, it’s critical to run all the wiring your home may ever need. Pre-wiring during construction ensures clean routing, future proofing, and zero compromises once the drywall is installed.
Speaker wire is pulled to every planned audio location and routed back to a central equipment area perfect for housing amplifiers, networking gear, and control systems.
Pre-construction speaker brackets are also installed at this stage. These brackets lock in precise speaker placement and make final installation fast and clean once the ceiling is finished. Secured directly to the framing, they ensure perfect alignment and a professional end result. With wiring, brackets, and control boxes in place, the drywall can go up completing the first major phase of a seamless whole home audio installation.

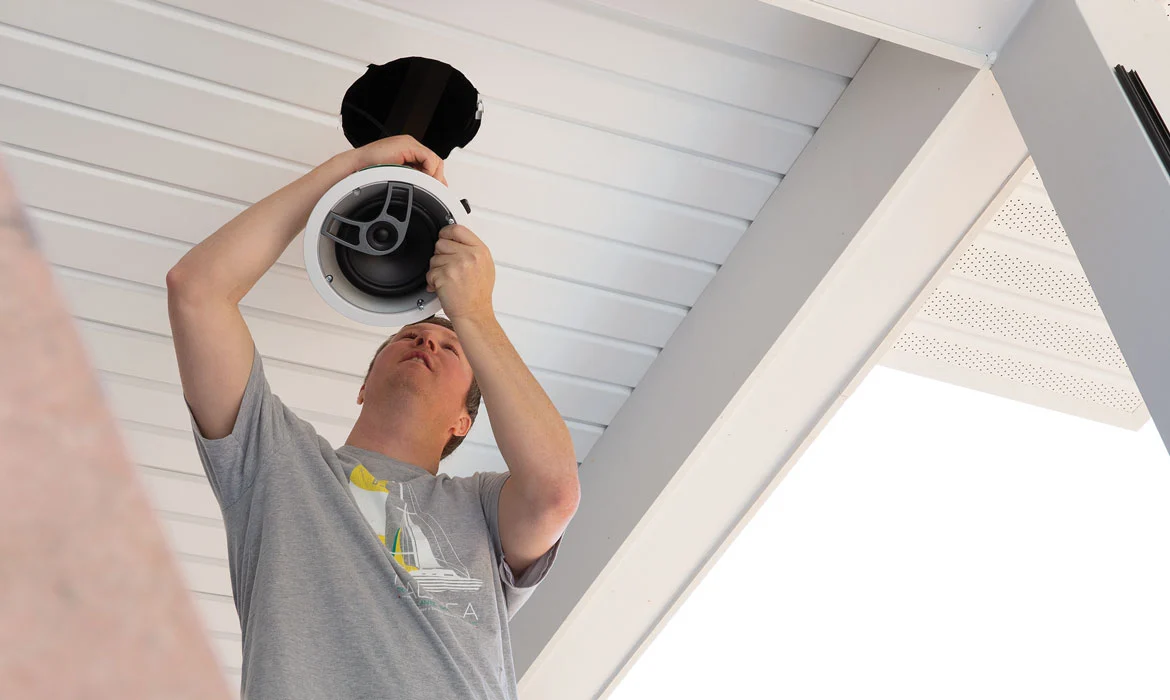
The trim-out phase of an audio/AV installation is where the finishing touches are applied to the pre-wired system, transforming the infrastructure into a fully functioning, high-quality setup. During this stage, installers mount speakers, connect them to the pre-installed wiring, and install faceplates, outlets, and any other necessary connectors. This is also when key components, such as wall-mounted control panels, AV receivers, and audio equipment, are placed and configured. The trim-out ensures that everything is seamlessly integrated into the home’s design, with all visible components neatly fitted and securely in place. After this step, the system undergoes calibration to optimize sound performance and ensure that all audio components are working together to deliver the best possible experience. The result is a clean, professional installation that enhances the aesthetic of the home while providing superior audio and AV performance.

The finish stage and teching of an audio/AV installation marks the final step in bringing the system to life. At this point, the installation team conducts a thorough inspection and ensures that all equipment is properly connected, functional, and fine-tuned. This includes configuring audio settings, and testing the system to ensure seamless integration with other smart home devices or networks. Calibration is key in this stage, as technicians adjust the audio levels, EQ settings, and surround sound parameters to deliver the best listening experience tailored to the unique acoustics of each room. Additionally, any software or firmware updates are applied to ensure the system is running at peak performance. Finally, the technician provides a detailed walkthrough of the system for the homeowner, explaining how to use the controls, troubleshoot common issues, and make adjustments to their new setup. The result is a polished, fully functional audio/AV system that enhances the home’s entertainment experience with professional-grade performance and ease of use.
Copyright 2026 Sound World All Rights Reserved. Designated trademarks and brands are the property of their respective owners. Use of this Web site constitutes acceptance of Sound World Privacy Policy. Powered by Rize Marketing